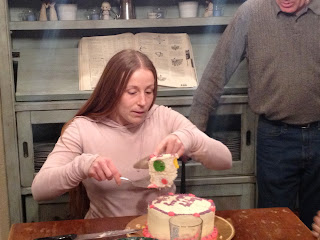
So my baby sister (I use that title lightly since she is only 2 years younger than me, and as you can see, she's definitely not a 'baby' any longer!) celebrated her 29th birthday (for the first time ~wink~) on the 18th. As the host of her fabulous birthday dinner, I wanted to make a special cake. For those of you that know me, cake, at least the decorating part, is not really my thing. My older sister is far more talented in the realm of the 3D, while I find comfort in my 2D cookie designs! That being said, I wanted something with a wow-factor, that I could successfully create. After scouring Pinterest, I came upon this tutorial from Once Upon a Pedestal and thought it was too cute not to try. This is a great tutorial and I followed it fairly closely:
First, I had found this pan at Bed Bath and Beyond in the clearance section. It's one of those fancy-shmancy cake pop pans. Now, I'll probably never use it to make actual cake pops, but it was perfect necessary for this cake and on sale for $9.99. Translation = Destiny! I used a white cake batter and separated it into 5 different colors. For those of you that are crazy for symmetry, I'd use 6 colors! I went with my sister's favorite colors (and a couple of mine!) with the yellow balls for the center of each cake layer.
(notice I forgot to spray the entire pan-don't worry, the pink ones came out just fine!)
pop on the top of the pan...peek-a-boo, I see you! (ignore me!)
Bake them in a 350 degree oven for about 1/2 the time suggested by the pan manufacturer. Mine were done in about 15 minutes. Yes, they will look like colorful volcano eruptions. Have no fear, the round shape holds up. Just peel off the lava flow and consider it a treat for the baker :)
mmm...colorful lava!
Voila! Beautifully round egg-shaped cake balls! The shape did not matter in the end result, but if I were to use this pan to make cake balls, then I would make sure to fill the base sections completely. At this point I froze the cake balls as suggested in the tutorial. Not sure that it made any difference, but I had the time.
The next step is to whip up another white cake batter. You'll notice that I use three 8'' pans here, but quickly realized that I would not have enough batter to cover each cake ball. I changed my strategy and used just 2 pans. Put enough batter in the bottom of each pan to cover it. Then place your cake balls in the pan and cover each with more batter. I used my 2 Tbl cookie scoop for the last step.
mmm....cake batter!
Bake for 30-35 minutes.
GBD-golden brown and delicious!
I frosted the cake with a simple buttercream frosting. My sister requested the girly colors!
make a wish!
I was nice and only put 9 candles on the cake.
must have been a great wish!
Finally...Success!!!
My sister is saying 'oooooohhh' in her super high-pitched excited voice at this point. And my father is saying his famous 'whoahoa', which means he's impressed!
Not the best picture, and it doesn't showcase all of the colors, but look how cute!!! I will totally make this cake again. Be sure to check out Once Upon a Pedestal for a full tutorial and ideas for other surprise cakes!
~Auntie Amy~


